Advance coding
The advance coding screen
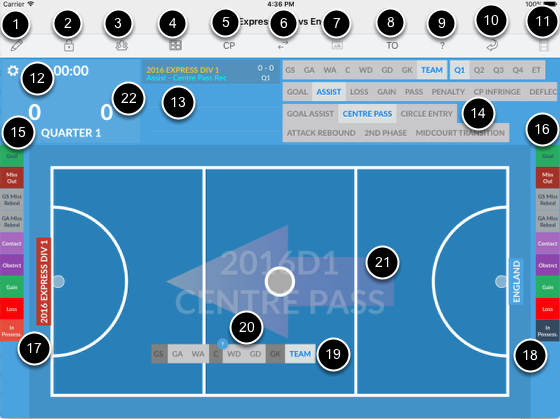
1. Toggle between edit and record modes
2. Lock quarter (and create next quarter)
3. Access Team Line-ups screen
4. Toggle on court grid lines
5. Toggle team with centre pass
6. Switch sides
7. Toggle court orientation (landscape/portrait)
8. Time out
9. Give point to selected team. Very handy when you are behind and want to catch up with live actions
10. Undo last action
11. Video mode - in Portrait orientation only
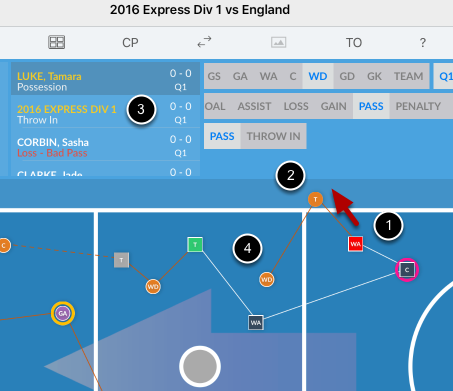
12. Edit match scores and state of play
13. Events list
14. Quick event editor
15 & 16. Quick menus
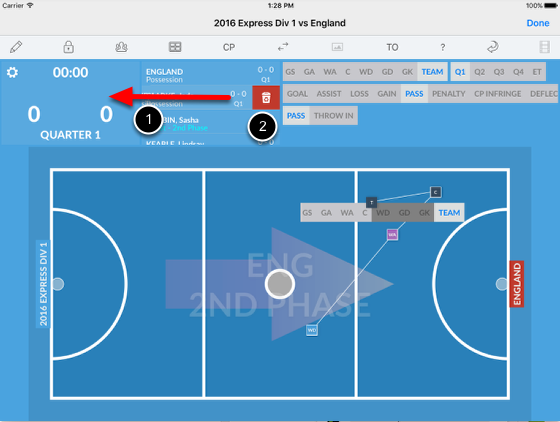
17 & 18. Switch possession
19. Players menu
20. Event indicator - circle for home team and square for away team
21. Arrow indicating current attack direction
22. Connection indicator - Green when there is a client connects to this session - red when the connections dropped off
Advance coding sequence
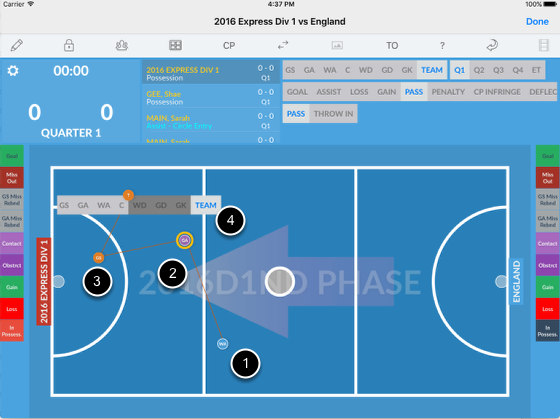
Making sure centre pass team and attacking direction is correct.
Tap on court where events occur.
1. Centre pass receive - blue indicator.
2. Second phase - purple indicator. Light orange outter circle indicates a circle entry.
3. Possession - orange indicator for home team and grey for away team. In this instance the pass is executed by the GA so the app automatically assign the possesion to GS.
4. However if a player can not be determined by the app a menu is shown so the user can select a player from. Only players permitted in the area are available for selection.
Record a deflection
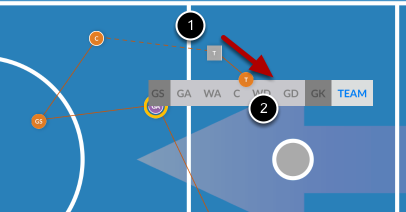
A deflection can be recorded by swiping from the location of the deflector (1) to where the ball ends up (2). Possesion remains with current team.
Record a deflection and gain (a tip)
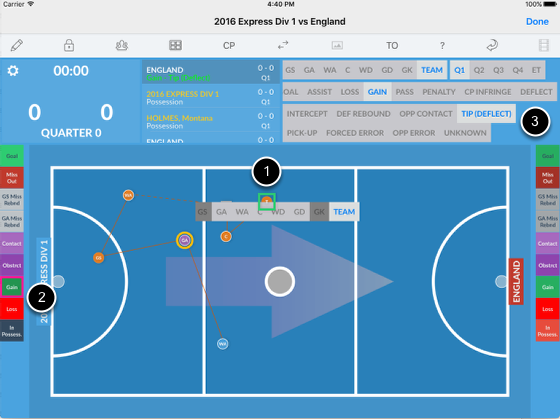
Ball was in possession of Home team. To record a tip (deflect) at position (1)
2. Tap GAIN - Indicator turns to a square to indicate an Away team's event. Colour changes to Green to indicate a gain.
3. Select TIP (DEFLECT)
Record penalties
To record a penalty, contact or obstruction, tap on appropriate button (1) on either of the quick menus
A pink ring or hollow square is shown around the current indicator (2) to indicate a penaly has occured at that location.
Short cut: You can also double tap on a location on court to record a penalty. The default is a contact.
If the contact is made on a centre pass (before the ball is passed) then the penalty is marked as a "contact on CP".
The app automatically inserts a penalty to the offending team and then a possession to the other team at the same location.
Record a Centre Pass Infringement
Simply tap inside the centre circle to record a CP Infringement to the Centre player of the team with the centre pass. A possession is created for the opposition team.
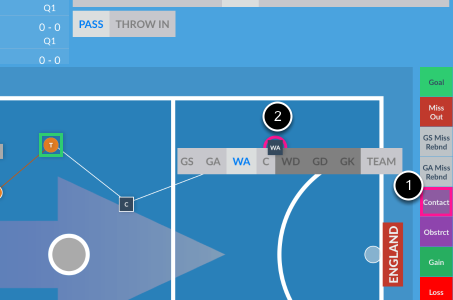
Out of bounds
1. Ball is thrown out of bounds by away team's WA
2. Tap in the dark area outside the court where the ball crossed the line.
3. Throw in action is indicated on list
4. Ball is in-bounded to WD
Record a loss
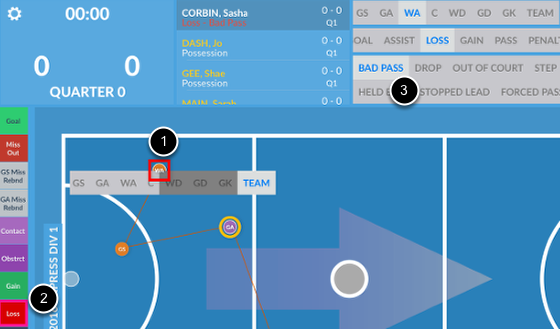
1. Home team's WA throws a bad pass
2. Tap LOSS on the quick edit menu - indicator at (1) turns to red
3. Select BAD PASS (or any other type of losses)
Possession is now with away team
Record shooting attempts
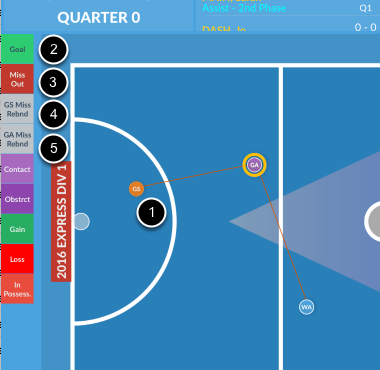
When a possession is recorded inside the attacking circle (1) the top four buttons in the quick menu are accessible for recording shooting possibilities.
When a shooter is indicated, in this example, the GS.
2. Tap Goal to record a goal to the GS
3. Tap Miss Out to record a miss goal attempt and the ball goes out of bound. Change of possession and in-bounded next to the goal post.
4 & 5 Miss attempt. A rebounders sub-menu is shown. Select a rebounder and the game goes on accordingly.
When a shooter is not indicated, shown as a T
2. Tap Goal then select shooter from sub-menu
3. Tap Miss Out then select shooter from sub-menu
4. GS is recorded for a miss goal attempt. Select a rebounder from sub-menu
5. GA is recorded for a miss goal attempt. Select a rebounder from sub-menu
Edit mode
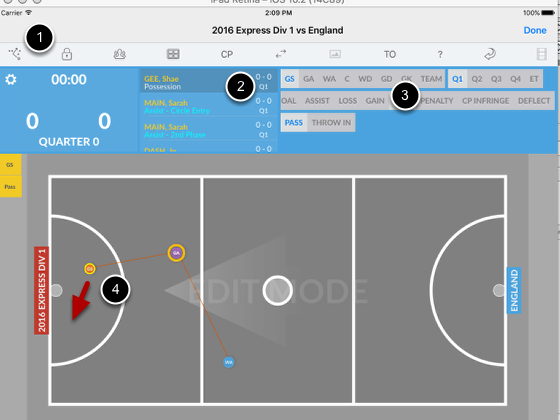
Although you can quickly edit events at any time by select an event on the events list (2) and change it's details in (2), you cannot change it's court location unless you enter the Edit mode by tapping Edit mode button (1).
The court colour turns to grey colour with EDIT MODE shown.
You can select events by clicking on them or from the events list (2).
Selected event is shown with a yellow surround. Tap and hold hold indicator to move to a new location if you wish.
Tap button (1) again to exit Edit mode and return to Record mode.
Delete an event
1. Swipe event to be deleted to the left
2. Tap delete button and confirm
Coding from a video
Coding from a video can only done in portrait orientation.
1. Tap to enter video mode
2. Tap to select a video
3. It is highly recommended that you pause the video and use your finger to swipe left and right on the video screen to navigate the video rather than playing it whilst coding.
The events are time stamped on the video timer (counter) so coding can be stopped and resumed without the events going out of synch.